GLASS FROG WORLD
- APR 01, 2018Warning: count(): Parameter must be an array or an object that implements Countable in /home/howlermag/public_html/old/wp-content/themes/new-paper/includes/general.php on line 193
Your Lead Paragrpah goes here
[vc_row full_width=”full_width”][vc_column][vc_column_text]
The Lesson
Shooting wildlife at night is a fun and challenging experience. Though I often use flash, I like using flashlights too. Whether you shoot with a professional camera, a point-and-shoot model, or a smartphone, you too can get great results at night by whatever flashlight you have on hand!
[/vc_column_text][/vc_column][/vc_row][vc_row full_width=”full_width”][vc_column width=”2/3″][vc_column_text]
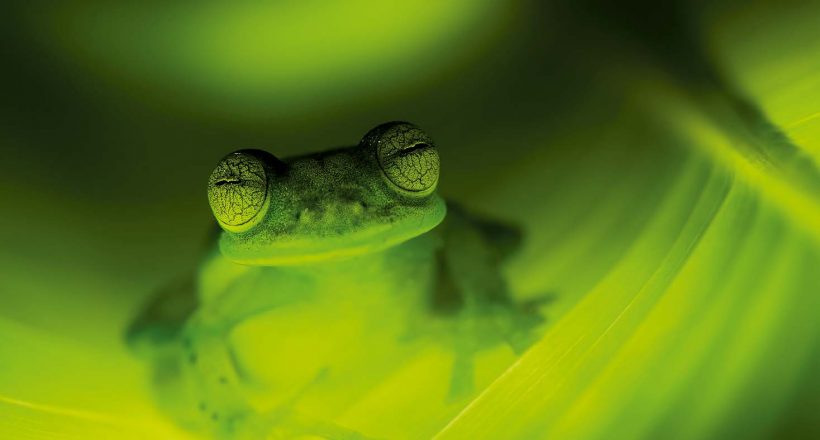
The Scene Glass frogs, named for their translucent skin, are delicate and elusive. The best conditions to find glass frogs are on rainy nights when they come out to breed in the vegetation overhanging rushing streams. This shot resulted from my quest a few years ago on a perfect rainy night in a Costa Rican cloud forest. After hiking around for a couple of hours with a friend, I spotted the perfect subject sitting on a nice heliconia leaf. I hoped to make a special portrait accentuating the nighttime habits and cool transparency of glass frogs. I wanted my photo of this emerald glass frog (Espadarana prosoblepon) to look otherworldly.
Camera Settings
Since I was out at night, I needed an artificial light source to take the picture. Flash is the obvious choice. Indeed, I had two flashes with me; it’s my go-to lighting solution for much of my rainforest work. But tonight I wanted a very particular look for my image, a spotlight kind of effect. While one can work with various studio accessories to control the spread angle of light from a flash, it can be a little tricky. Knowing that getting exactly the right look from my flashes could take a while and stress my subject, I chose flashlights, which would allow me to get a real-time preview of my lighting and make rapid adjustments while photographing. I could get the shot I wanted pretty quickly and then let my glass frog buddy get back to looking for a mate!
With the flashlights decision made, I had two more issues to work through. The first was exposure. Since it’s pitch black out in the forest, I would only know the correct exposure once I illuminated my subject. I chose to shoot at f/11 in order to give me enough — but not too much — depth of field, as I wanted some of the leaf to taper off into a blurred look. Since I was using flashlights, I wouldn’t have the motionstopping benefits of flash. This aperture also gave me a reasonable shutter speed (1/8) at a decent ISO (800), which was important because there’s always a bit of breeze in the forest.
The second issue was how to light the frog and leaf for the mysterious look I wanted, and of course how to hold everything. I shot from a tripod while holding a cable release in one hand and one flashlight in the other. My friend held the other two flashlights. Our idea was to have the light shine mostly through the leaf, rather than directly on the frog, to provide that green glowing look, and also make sure that the leaf didn’t receive any flat, on-axis light. By adjusting the beam spread on the flashlights, we were able to create some cool shadows and brighter areas.
Processing
I use Adobe Lightroom for the vast majority of my processing, and this image was no exception. I used the shadows and highlights sliders to adjust contrast, and the spot removal tool to deal with a few specks of dirt on the leaf. Processing took no more than a couple of minutes.
[/vc_column_text][vc_column_text] [/vc_column_text][/vc_column][vc_column width=”1/3″][vc_gallery type=”image_grid” images=”4920,4918″ img_size=”full”][vc_column_text]Image Lighting: Nikon D700, Nikon 105 mm macro lens, tripod and ballhead, aperture priority mode, -2/3 exposure compensation, matrix metering, f/11, 1/8, ISO 800, cable release, 3 maglite flashlights[/vc_column_text][/vc_column][/vc_row]


