If you have lived or visited here in Costa Rica for a long time, you have seen the slow evolution of internet access. Protected by a quasi government monopoly, 3G, then 4G, and now 5G internet has been a battle to open the markets, and cable and fiber optic connections are relatively new, restricted mostly to urban and some tourist areas. If you live in those fortunate areas with fiber optic connections, lucky you. If you live in the more traditional, rural areas of Costa Rica, it has been a struggle.
When we arrived in 2010, we had zero internet service at our finca out in the hinterlands of Puriscal. We drove up into town to a friend’s place once a day to check email etc, and would struggle with using our iPhones as hotspots with extremely slow connections. Later, we were finally serviced by a local provider that offered internet using line-of-sight broadcast towers. We had a 9 meter tall mast built on our garage to get high enough to catch the signal from across the Central Valley. It was not cheap, and it was not fast: $75 a month for 4 Mbps download and 2 up. Watching videos was painful, if not impossible.
Through time it got better, up to 20-40 Mbps, and costs got reduced to $60 a month, but our trees grew taller, our speeds started slowing, and last September they suggested raising our mast and moving it uphill, at quite an expense. Then the internet universe in Costa Rica changed.
In September of 2023 Starlink, a part of Elon Musk’s SpaceX ( I plan on not discussing politics here ), got government approval to sell in Costa Rica. They offered a $9 refundable, upfront payment to get on the waiting list for when they started shipping. They did not announce how much the equipment would cost, or how much monthly fees would be, but I figured for $9 it was worth a gamble.
I was informed at Thanksgiving that starting December 1st they would start selling and shipping units and I had seven days to order at the introductory price: 109.000 colones for the dish. The standard service would be 33.000 a month, about $62 ( note that the introductory price for the equipment was only good until December 12th, now it is twice that at 219.000 ). It came with a 30 day trial, where you could return it for a full refund.
I decided to go for it, $200 was not a great expense for a potential huge increase in internet speed, so I decided to order. This is where the fun started.
The Starlink website ( https://www.starlink.com/) for ordering did not do well with Costa Rican addresses, and that is being kind. If you are interested, when you order, just put it in your closest town and province for shipping – you can fix the addresses ( you’ll need to fix 2) later.
After ordering, you get the tracking number. Starlink uses DHL to deliver and as soon as you get your number, go into the DHL site and change the delivery address to yours, if you think DHL can deliver to you, or change delivery to one of their service locations. Having dealt with DHL trying to find my finca in the past, I chose delivery to one of the service locations.
It turned out that so many people ordered units in the first 12 days of December that DHL was totally overwhelmed, and are still delivering the backlog of thousands of boxes. Mine floated around in the DHL ether for several days until I was finally contacted by DHL that it was ready. When I arrived at the service center in Lindora, the boxes of Starlinks were stacked up like a giant Jenga game in the corner!
So I retrieved mine and proudly showed off the box ( it seems to be a tradition now in Costa Rica). Now to the next step: seeing if it worked. 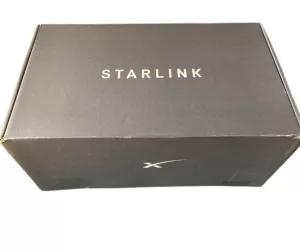
Starlink comes with no written instructions, just a big diagram on top when you open the box, looking somewhat like the drawing that was put on the Voyager space mission. No words, just a picture. Turns out they designed it for everyone- you need zero knowledge of the internet, routers, ipv4 versus ipv6, etc, etc. In the box are 5 pieces: The dish, its stand, the ‘Starlink’ ( which is actually a router), and the cable from the dish to the router and the power cable. You put the dish on the stand, connect the cable from it to the underside of the router, plug in the power cable on the bottom of the router, and you are ready to test. If you are knowledgeable about your wifi at home and have an existing router you wish to use, order the additional ethernet adapter so you can use your own router.
Before you plug it in, download the Starlink app onto your phone ( Android or iPhone), it is essential for installation. The first thing to do is find a place to test using the app. There is a feature where it scans the sky, gobbling up little dots like PacMan, and tells you where obstructions are. For testing it does not need to be perfect, but use the app again to locate a permanent location for your dish. I just set mine on the back patio for testing and it was good enough. Then plug it in.
The unit powers up, but the only indication is a small light on the underside of the router. The app detects the unit and the dish magically starts scanning the sky to figure out where it is. While that is happening you can give your Wifi network a name and password.
If you are lucky and you were able to put in your address for delivery where you actually live, then you may sync up immediately. If you are like most of us, you’ll get a message that the unit is too far away from its service address. Mine thought it was somewhere near Cartago. To fix this, there is a map in the app or the website where you can drag a pin on a Google map to your location. The understanding is the service location and the dish needs to be within 1000 meters. Once you fix that, the system must update the location, so it takes about 15-30 minutes, then you can restart the system.
Once connected, the dish moves to its permanent location. Here in Costa Rica, you need a clear sky for 180 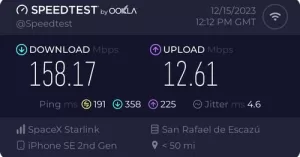 degrees around, pointing north, from about 75 degrees. The dish almost points straight up. After a couple of minutes, you will get an all clear on the app and you are ready to go. There are speed tests on the app, or connect your computer or phone to the Wifi network you created and test. Most people are getting between 200-250 Mbps download and 18-25 Mbps upload. My fastest measured download has been 274 Mbps.
It takes a full 24 hours for the dish to settle in, you will see it speed up and also create a map of obstructions. If you have small obstructions, it is not a big issue, but large ones will cut out service at certain times of the day.
Finally, find a permanent location for the dish. Since it points almost straight up, I just screwed the base onto my roof. I also then reused my Wifi extenders, connecting them to the new Starlink router.
I ran both my existing internet provider and the new Starlink for two days of testing, then canceled my existing service. I feel for the smaller, rural providers here, this is a game changer, and they are not on the winning side.
The speed improvements, especially upload, have been amazing. Video calls and uploading hundreds of my photos for storage are no longer an issue. Gigabyte software updates take minutes instead of hours. Streaming comes in as HD now, not a pixelated blur. We even got heavy rain the other night and it did not slow down at all.
We feel part of the 21st century.